Showing posts with label Design Studio. Show all posts

December 2, 2010

It's the most wonderful time of the year!

Welcome to December, my favorite month of the year. It always goes by way to fast. I love to spend time decorating and making gifts for friends and family.

This year I have discovered vinyl, glass, and etching.....ADDICTION!!!
I made this cute little glass block for a dear friend of mine. I am happy to say she loved it!

I used Design Studio and the font from Wild Card to make the saying out of vinyl. I first cut a large snowflake from contact paper and used it as a stencil to make the blue snowflake in the background. This was created using Alcohol Inks. Then I added the phrase, "Snowmen fall from Heaven unassembled." A little ribbon bow and a cute little Snowman riding a sled finished off this cute little lamp. It is lit with a single 50 ct strand of mini lights.

I have made some other cute items, but can't post them until after the holidays.

Image and video hosting by TinyPic

September 29, 2010

3 More Days

Only 3 more days to get your submissions in for a prize!! Does no one want to play? :( Help me out here people? For more info click the link up on the top right!
Image and video hosting by TinyPic

September 26, 2010

Design Studio Challenge Prize

I have decided to extend the deadline for for the Design Studio Collage Challenge to 11:59p.m. PST on October 2nd. You can see the details in this post.

Here is what you will be playing for:
12 Double Sided papers from K&Company DayDreams line
A set of 7 Garden Borders clear stamps from Tricia Santry Studios
A 6x6 Chipboard book containing 5 pages from Studio 18
Let's see those entries ladies!!
**************************************

September 22, 2010

Friends

One of life's most important treasures. Friends. Someone that is always there for you. A shoulder to cry on. Someone to laugh with, someone to vent to. Some of the strongest bonds in my life have been made through my craft of scrapbooking. There is a bond so strong. We know each other through our pages, and in turn that makes us friends.

So with friends on my mind, I went to my Design Studio. What I came up with is something entirely new for me. There are no pictures involved. LOL I made a template for this cute little gift bag.
Would you like to try your hand at making this? If you would like the template please leave a comment telling me how you and your BFF met and your email and I will email you the link.

Carts used: George, Storybook, Graphically Speaking
12x12 mat needed
**************************************

September 20, 2010

Design Studio Collage Template **FREEBIE**


Hello friends! Been awhile since I have posted anything with any real substance. Life just gets in the way at times.

Anyway last night I was playing around with Design Studio and worked up this cute little collage template. The whole template is made with the George Cartridge on a 12x12 mat.
I cut the template out on this wonderful metallic black card stock, then I added a background and photos that would really make the template shine. The template is perfect for 2 4x6 photos and 3 2x3 photos in the circles. There are so many ways that this could be used....just use your imagination!
So do you like prizes? Sure you do. I am headed to the Portland Scrap Expo this weekend and will be looking for a fabulous prize. What would I like you to do?

1. Download the above template. here
2. Create a layout using this template and post it below using Mr. Linky
3. Follow this blog.
4. Share this with your friends on your blog or on Facebook for an extra entry, even if you can't participate in the challenge.

I will choose a winner from from all the entries using Random.org. Contest will end on September 30th at 11:59pm PST. Good Luck and I can't wait to see all your wonderful creations!
**************************************

August 28, 2010

I carry my Cricut on my back!

So we all know that we can make awesome things with our Cricuts, but did you know that you can design stencils? Sure. You knew that. Did you know that you can use that stencil on any surface? Yep, even the human body.


I designed my tattoo using Design Studio and the Home Accent Cartridge. The tattoo artist did the lettering on her own. I love it may use Design Studio again to make another.

You are only limited to your imagination!!


**************************************

August 24, 2010

How about another one??

I am feeling generous today....

Isn't this guy just adorable?? The little googlie eyes just make this card fun!

Simple A2 card cut. Hello Owl: Cut from Stamping Solutions Cart, Storybook, and George. Any size mat will do.
I added a little detail with some ink and Bic Mark-its.

Enjoy! May still have more to come yet!!
**************************************

Design Studio Freebie

Ok, I haven't been on in awhile and I just want to post something, so how about a freebie? Does that work for you??

Here is Retro Lace: Made with Home Accents on 12x12 mat

Please note that this cut takes quite a bit of time to cut.....patience is needed!!!

Enjoy!!

*************************************

July 14, 2010

Design Studio Tutorial #1-Basic Welding

Ok ladies, I am gonna give this a shot. Let me know ho
w everything looks, and if I need to change anything.

Welcome to Design Studio!! The most basic feature and one of the main reasons I love my DS is for the simple fact that I can weld any 2 or more objects together. Here is a very quick lesson on two ways to weld. I am working with the George Cartridge using shapes, but this tutorial can be applied to any cartridges that you own.

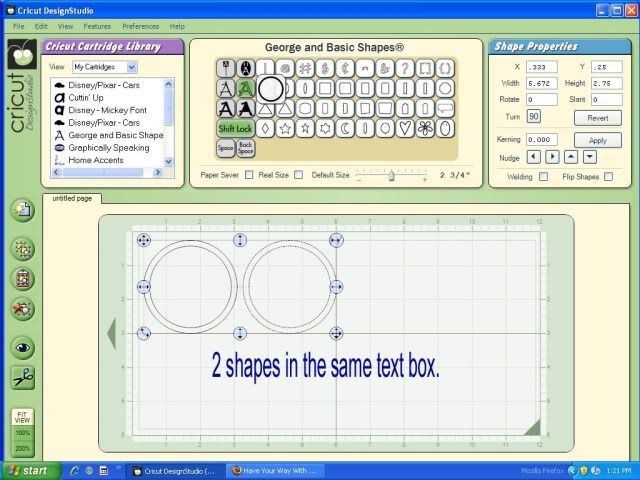
The first way to weld is to have your object in the same text box. In this case I chose two circles.
Photobucket

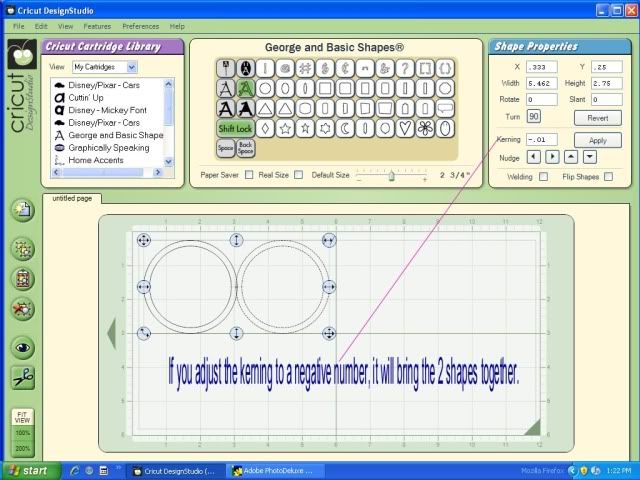
Then go over to the kerning box and enter a negative number. Try -.01 or -.02 to get started. The smaller the number, the closer the objects will be together. If you just have 2 objects, you can also use the nudge arrows, but we will get to those in another lesson
Photobucket

Preview, Preview, Preview. I can't say this enough. To preview your work and to see exactly how it will cut, open a second page, and click on the eyeball.
Photobucket

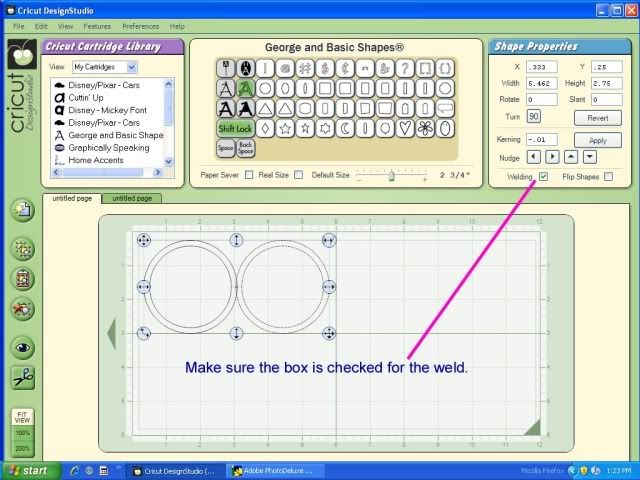
I noticed that the weld box was not checked while I was in my preview. When working with shapes all in the same text box, clicking the weld box will make everything in that text box welded.
Photobucket

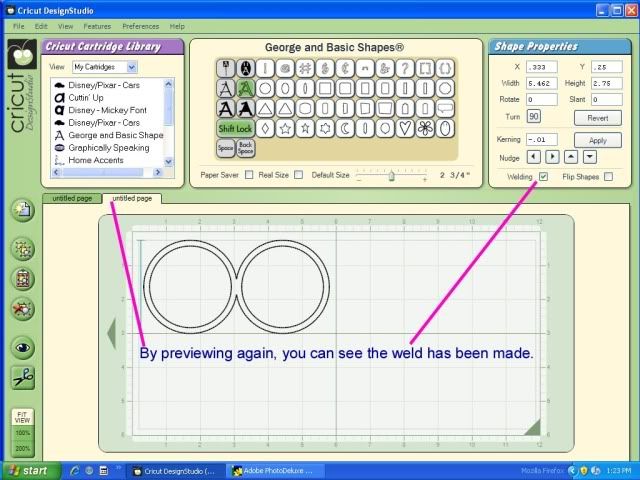
Previewing your page again, you will see that the weld has been made and see exactly how your cut will look.
Photobucket

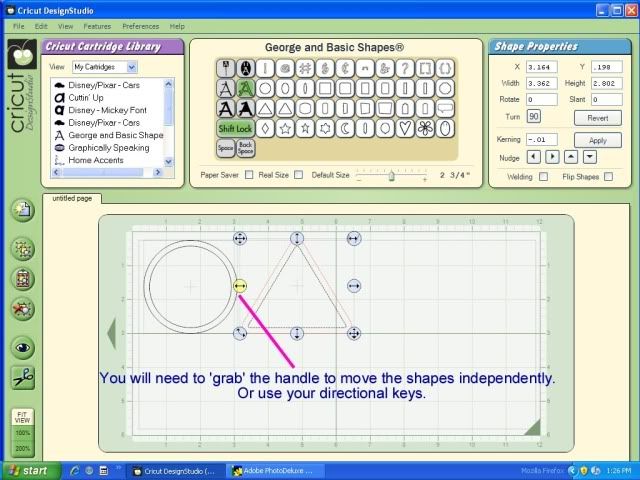
The second way to weld is using objects in separate text boxes. Here I chose a circle and a triangle.
Photobucket

For this type of welding the kerning will not work. You will have to 'grab' the objects with the handles to move them or use the directional keypad.
Photobucket

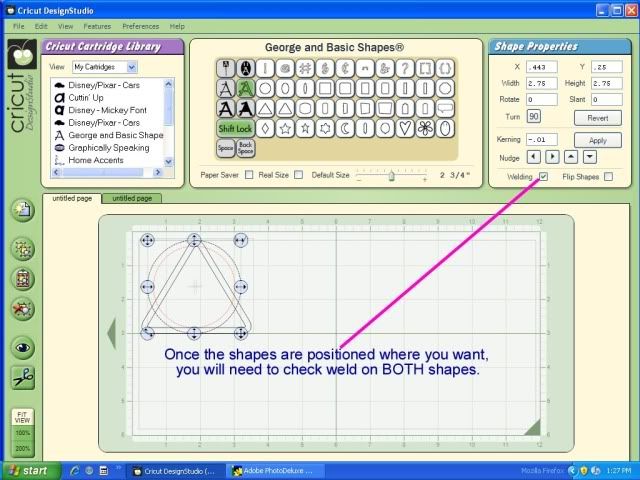
Since the images are independent of each other, you will need to click the weld box for each image that is to be welded together.
Photobucket

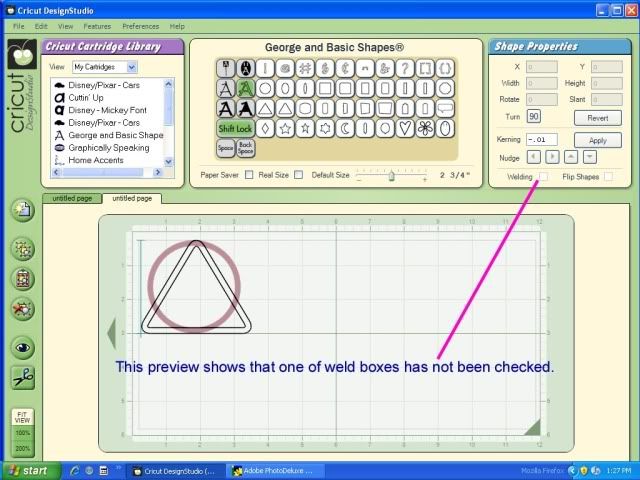
By previewing yet again, you will see that one of the shapes did not have the weld box checked.
Photobucket

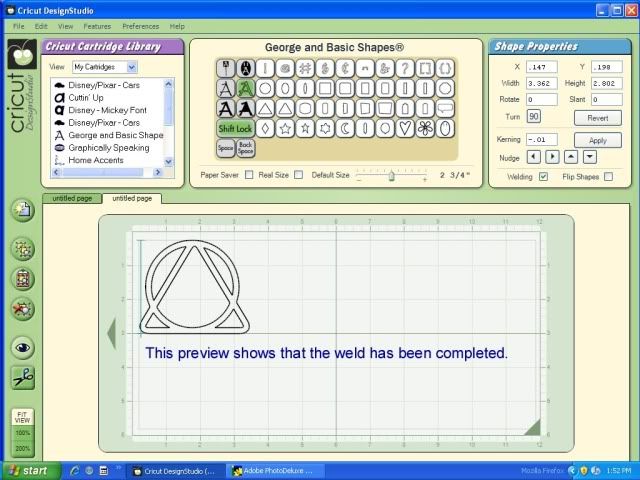
After going back and checking the weld box and previewing again, we see the weld has been made and you are ready to cut.
Photobucket

I hope this tutorial helped those that needed it. Please let me know what else you want to learn. Now let's break out those Cricuts and Computers and get to welding. I would love to see a welded title on a layout!!
**************************************

June 16, 2010

Gratitude.....and some freebies!

I'm just putting this out there, cause well, frankly I need to say it. I'm no longer sure why I bother to blog. I have a very meager following. I like to design and give things away, but at the same time I think I deserve a little gratitude. I have posted 11 free cut files for the Cricut Design Studio with a total of 76 downloads. That's awesome! Glad you guys like them. But seriously, would kill anyone to post a thank you?

I post a give away and unlike many other blogs of this type I have not had one reply. So if you are part of my 32, thanks for really following. If you are one of the 76 free downloads, thanks for the thanks.

I try my hardest to follow all the blogs I read. I may not post a comment on every post, but when I 'take' something from someone I was always taught to say thanks.

These will be the last freebies I post here unless I have a special request or am shown some gratitude.

Ice Cream Title: Potpourri Basket and Cuttin' Up, any size mat
Full Page Lace: Storybook, 12x12 mat

Sorry if I am being a bitch....maybe it's the PMS talking, maybe it's just me being frustrated, maybe it's me feeling sorry for myself.....but getting it out is what a blog is for, right?

I truly do hope to see you all stick around, I do love to give things away......

*************************************

June 13, 2010

No Excuses......make me accountable! (There could be some BLOG CANDY for you!!)

Hey there my wonderful 32 followers! Once again I have been caught missing in action. I have no excuse. I am just slipping into another of my famous funks. I need your help to get me out of it! I changed the look of this place once again.....now I just have to start posting once again.
My vacation was wonderful, but exhausting at the same time. I am excited to start scrapping all those Disney pics, and just received my 150 prints to get started. I also purchased the Mickey Mouse font cartridge for my Cricut.....so exciting!

I have been working on some other craft projects, jewelry making and beading. Fun, but killer on my my poor arthritic hands, so I won't be doing much of it. I think I will stick to working with paper....now if I could just make a little more money doing it.

So what I need you to do is spread the word of my blog....


1.become a follower then leave a comment about what you like most about my blog
Is it the free cut files, the sketches, or just some inspiration?

2.post about my RAK on your blog or Facebook page for a second entry.

On June 27th, I will put all the names into a drawing for a nice prize from my stash.
Surf's Up
Mickey Head/Flower Border was design on Cricut DS using the George Cartridge. If you would like the cut file, leave a comment below with a contact email.


Simple Math


**************************************

May 7, 2010

7 days till Disneyland.......and your Friday Freebie

Well there is only seven days left till we head ou on our 15 hour road trip to California. We are so excited. I have never been and can't wait to experience it with C.J. for the first time together. We are travelling with some friends and for the little ones I decided to make autograph books.
I just love how these came out. And guess what? Yep, these are your freebie! It includes the title page that you see on the girls' books and the pages themselves.

Disneyland Autographs:
Carts: George and Mickey Font
Mat: 12x12

Enjoy.....I will not have a freebie for next 2 weeks!

Love to see you are all downloading the free stuff! Remember I would love to see what you have done. Maybe I will post a DS Challenge using my cuts when I get back........Let me know what you think!
**************************************

April 23, 2010

1...2....3 Freebies!!!

I'm back! And I hope you enjoy what I have for you today. Now that things are semi-back-to-normal, I have had time to get back into my craft room and get some designs done, as well as some layouts.

First I have for you a really simple title. Hope you enjoy it! Timeless

Catridges Used: Storybook, Plantins Schoolbook, and Graphically Speaking -- Any size mat

Next up I have for you, another A2 card frame. Isn't this cute? XOXO Frame
Catridges Used: George and Wild Card--Any size mat
Last but certainly not least, The A2 3 layer Aloha frame.

Catridges Used: George and Wild Card -- Any size mat
For this card I cut three layers in 2 colors and then added vellum to the back of the white layer.
I hope you enjoy these! Happy Scrapping!
**************************************

April 2, 2010

Story Time Freebie

We all read to our kids, right? And I am sure somewhere along the line you get pictures. Or even pictures of your little ones reading on their own. Well I have just the title for your page.


Story Time TitleCarts used: George, Plantin, and Graphically Speaking!

On a side note, I see that lots of people are dowloading these freebies! I love that! But please if you post the work somewhere please refer back to my blog where you found the file. And remember I would love to see what you create! Thanks for looking!

Happy Easter and Happy Scrapping!


**************************************

March 26, 2010

Friday Freebie!!

That's all I got today...just the freebie. That's enough right?

Today's freebie is a slotted journaling tag. Wouldn't this be cute with some striped paper under the little slots?


Carts used: George and Graphically Speaking, any size mat

If you download and use the file, I would LOVE to see it! Share a link here!

**************************************

March 20, 2010

I've been a busy bee, but I didn't forget the freebie!

I have been working on a project for all my little bowlers. Today was the last day of the season and I wanted to do something special for the kids and the parents. I found the instructions to make word books using my Cricut Machine and Design Studio at Invincible Summer. This site has a very detailed tutorial for making your own word books. Here is a pic of the ones that I made.....I made seven of these in 3 days......A LOT OF WORK!So, I did find some time today to work on a design for a freebie. It is simple but I think you will find that it is beautiful and easy to use to border a page. You can download it here.
Cartridge used: Graphically Speaking, 6x12 mat
I also managed to get a couple layouts done today as well. Awhile back I volunteered to become a Chocolatier over at http://www.cropchocolate.com/ . As a chocolatier, the website would send me some product and I would create a layout(s) or other project displaying the products they are going to sell. Here is what I came up with:The Products that I used from http://www.cropchocolate.com/ are:
Basic Grey Chipboard Sticker (Flourish)
MM Paper - {noteworthy} Ava Loopy Stripe
Basic Grey Buttons
MM Whimsy Alpha Stickers
Ribbon
Other:
Citrus Teal Card Stock from ANW Crestwood
KI Memories Daffodil 2 transparency
Studio G glitter glue
Last but not least a fun birthday layout. I had so much fun creating this. The papers are from Crate Paper and part of a kit from Heartstring Designs. This is an awesome club if you don't want a 'contract.' They offer great scrapbooking kits and card kits. If you don't like the preview for the next month, you DON'T have to purchase. You are not deferring, you are simply opting out. It is a lifetime membership and you only order the kits YOU WANT! They also include in every kit these awesome mat board cut outs. See the candle and flame on my layout.
Thanks for stopping by, become a follower today and get new freebies every week!
**************************************

Swidget 1.0